I decided to fabricate a custom aluminum intake manifold after doing a lot of research and seeing different examples of intakes being tried on the V6 3.7L Cyclone engines. There have also been promises of custom intakes being made by MMR and Super Six Motorsports but they have never materialized and were going to be very expensive. Then there is the Jenvey intake but it is expensive and has the tuning nightmare to go along with it. Even after doing the CAD design myself I got a quote from a local fabrication shop and they were still estimating $3,000. It was after this and researching what the materials would cost that I decided to attempt making it on my own. This post will explain how I came up with the design, where I purchased the material, how I cut and machined the pieces and their dimensions and the cost.
Design
The goals I wanted in designing the intake:
- Replace both the upper and lower intakes
- Keep the OEM fuel rails and injectors
- Fit under my Trufiber hood – no strut tower brace
- Use the factory gaskets
Things I had to take into consideration:
- The PCV tubes from the valve covers went into the intake tube and the OEM upper intake behind the throttle body.
- The EVAP line goes into the upper intake right behind the throttle body.
- The OEM lower intake has the coolant tube built into it.
- The brake booster has a vacuum line going into the OEM upper intake near the throttle body.
- Since the throttle body location is moved the normal CAI intake tubes won’t work.
Research
The following were sites that I kept going back to study the designs and calculations of various intakes.
Intake Manifold Design
http://www.theturboforums.com/threads/361799-Intake-manifold-design
Jack’s turbo build (was originally a twin turbo build)
http://houston-imports.com/forums/showpost.php?p=12906043&postcount=421
Sauwnthony’s twin turbo Fox body build
http://www.theturboforums.com/threads/346706-395-twin-T70-s-Full-3-5-exhaust-A-C-PS-billet-intake-stock-hood-pizza?p=1779582#post1779582
Intake Manifold Tech: Runner Size Calculations
http://www.team-integra.net/forum/blogs/michaeldelaney/130-intake-manifold-tech-runner-size-calculations.html
Calculation Of Intake Runner Length
http://www.exx.se/techinfo/runners/runners.html
Tech Feature: Custom Racing Intake Manifolds
http://www.enginelabs.com/engine-tech/tech-feature-custom-racing-intake-manifolds/
Intake Manifold flow analysis
http://josephrinek.com/intakemanifold.html
Wilson Manifolds
http://www.wilsonmanifolds.com
Also MMR, Popeye and KerrDog’s manifolds and countless other sites that I didn’t save the links for.
Materials
This is a list of the materials required to make the intake in its final form. There were a few pieces I bought that didn’t get used in the end and I didn’t list them here. The total cost of the parts below comes to $1,080.40. This does not include tax or shipping in some cases. But that also includes the water hose (tube), oil catch can and CAI that aren’t costs to really build the intake itself but are necessary for it to be used. The cost could have been $234 lower by not using the velocity stacks. Also, I can get some money back by selling my ported upper and lower intakes, Airaid CAI and JLT catch can.
Ross Machine Racing
Oval Velocity Stacks – $39/each – qty 6 – total $234
Oval Runner Tubing – $15/foot – qty 3 – total $45
Aluminum Fuel Injector Bungs – $4.50/each – qty 6 – total $27
OnlineMetals.com
Aluminum Plate 6061 – 0.25″ x 7″ x 9″ – $13.86
Aluminum Plate 6061 – 0.50″ x 4″ x 4″ – $7.20
Aluminum Sheet 6061 – 0.125″ x 14″ x 15″ – $33.60
Aluminum Tube 6061 – 3.5″ x 0.25″ x 3″ – $10.71
Aluminum Rectangle – 0.5″ x 0.75″ x 48″ – $7.25
eStreetPlastics.com
Clear Acrylic Plexiglass Sheet – 3/8” Thick Cast – 9″ x 18″ – $9.49
eMachineShop
I used their software to design and submit the order for the intake flanges. Cost is more expensive doing small orders. It cost $263 for a pair of them including shipping. If I would have ordered 4 sets of them they would have been $508 or $127/set, half what I paid for my one set.
Tasca Ford Parts
F150 water hose (tube) – BL3Z8A505A – $16.68
Engine Coolant Outlet Flange – BL3Z8C368B – $56.41
Engine Coolant Thermostat Housing Bolt – W503279S437 – $0.55/each – qty 4 – total $2.20
Team Cyclone Racing
Oil Catch can – $129
Race Part Solutions
Silicone 3 Ply Reducer Step Hose 3.00/3.50 Black – S300/350BLK – $19.95
T-Bolt Clamp for 3.50″ Silicone Hose Tbolt T Bolt – 333363-JOD – $4.95
3.50 Aluminum Tubing 16ga scrap piece
-6 AN Female Aluminum Round Weld Bung – 490906_JOD – $3.95
Radius Fitting -6 Flare x -6 ORB – 436060 – $6.50
Used Coyote Airaid CAI – $225
Cutting and Machining
I knew after making my custom battery mount for my lightweight Odyssey battery that I could cut and machine the 6061 aluminum myself. It was just going to take a lot of time. Using the correct blades, drill bits and cutting speeds it can be cut with various saws, drills and a router with no issues.
Tools used
Kobalt 10″ sliding compound miter saw
Craftsman 8″ drill press and various drill bits
Craftsman router and router table
Carbon steel 40 piece metric Tap and Die set from Harbor Freight
Flanges – I initially started making these on my own and realized that the gasket grooves were going to be extremely hard to do. Therefore I outsourced this to eMachineShop for the basic milling and then finished them up my self.
Oval runner tubes – were originally cut to 4.5″ with a 12 degree angle at the flange end. But after mocking up the intake these were going block the air inlet into the plenum. I reran the calculations for the runner sizes and decided to cut them an inch shorter even though that was going to move the power band up more.
Plenum ends – the 1/4″ plates were cut to a height of 4.5″ with a 12 degree angle from the bottom center point to the outside edges. The front end plate had a hole drilled and then router out to the correct size for the tube connecting to the throttle body plate. The rear plate was drilled for the vacuum line for the brake booster.
Plenum bottom – the 1/8″ sheet was cut to 7″ x 14″, bent in half long ways to an angle of 24 degrees and then holes for the oval runner tubes were drilled and then routed out.
Plenum sides – the 1/8″ sheet was cut to 4″ x 14″
Plexiglass support – the rectangle bar was cut into two 7″ pieces for the front and back and two 12.5″ pieces for the sides. Holes were drilled and tapped with a 6mm x 1.0 thread for the plexiglass to be secured.
Plexiglass – was cut into a 7″ x 14″ piece with holes drilled and countersunk for the mounting screws
3.5″ Tube – was cut to 2.5″ with a 12 degree angle on the throttle body plate end
Throttle body plate – Four holes were drilled for the throttle body mounting holes and were tapped with a 6mm x 1.0 thread. The main hole was started by drilling a large hole and then using the router to mill it out to the correct size. A small recess had to be made for the throttle body in the lower left corner by using the router. I was going to mill out for the factory gasket but instead decided to use aftermarket gasket material.
Welding
I’ve done welding before. It was a few years ago. Back in 7th grade shop class and I didn’t care for it. Therefore I left this part to an expert. But based on the cost I need to learn how to weld. Shops in my area average $75/hour. The welder I had do it charged $80/hour and he said he spent about 9 hours working on it. He said if I paid in cash he charge me $600; I liked the work he did and paid him $650 in cash.
Final Results
Alright so besides the intake looking bad ass I am expecting a power gain from the design. I would be happy with no power gain as long as there was no power loss just because of how it looks.
Well after taking it to the track twice my fears were confirmed. ??I lost power I believe due to the runners not being as long as I would have liked. ??I plan on keeping the intake for a future stage of the car but will be putting the factory ported intake back on for now.
Pictures
Flanges before I milled the runner and injector holes larger. I wanted to use the factory gaskets so I didn’t have to worry about machining it flat again after it got welded.
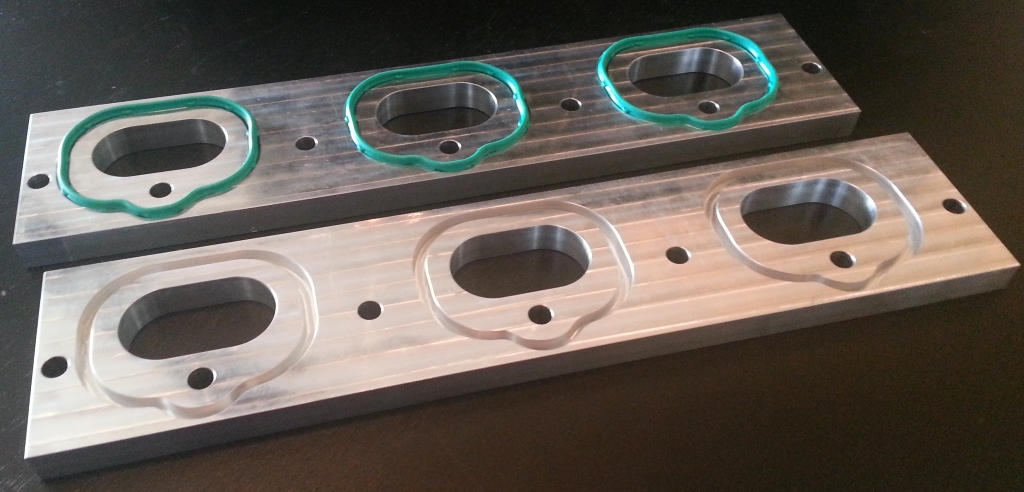
Custom flanges
Here it is after I got it back from the welder and I cut and drilled the plexi top but the screw holes aren’t counter sunk yet.
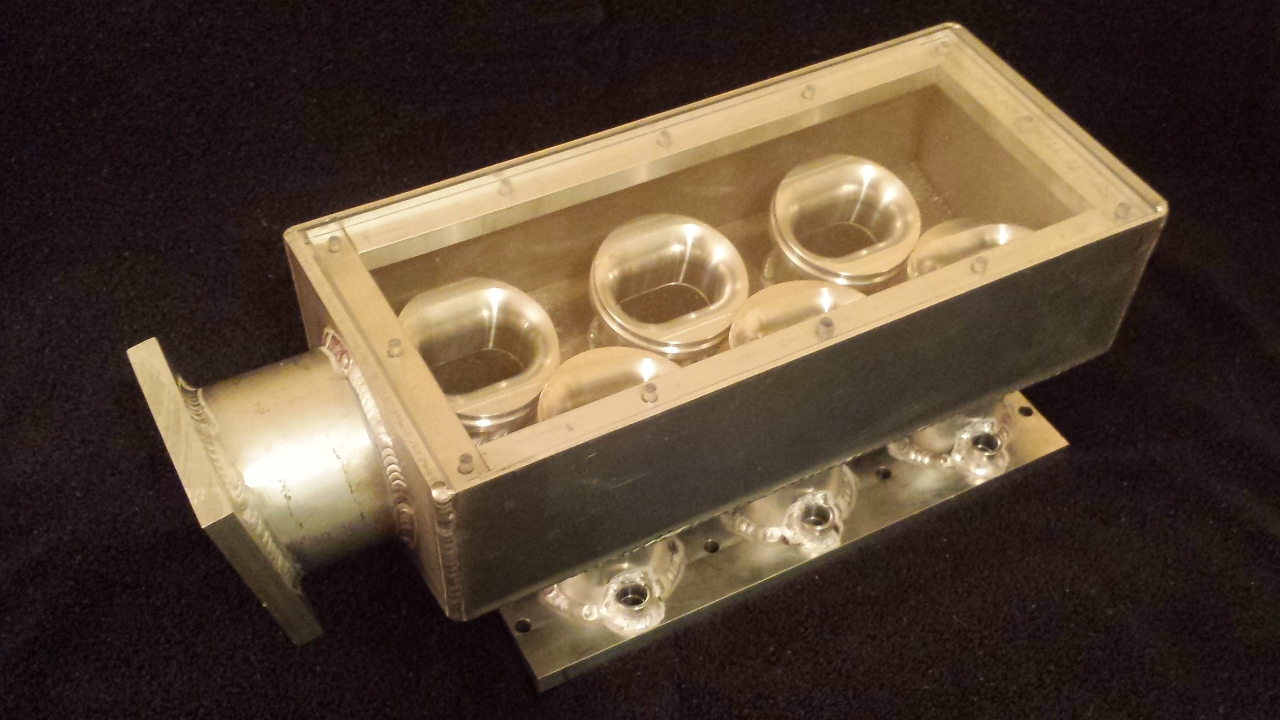
Custom Intake
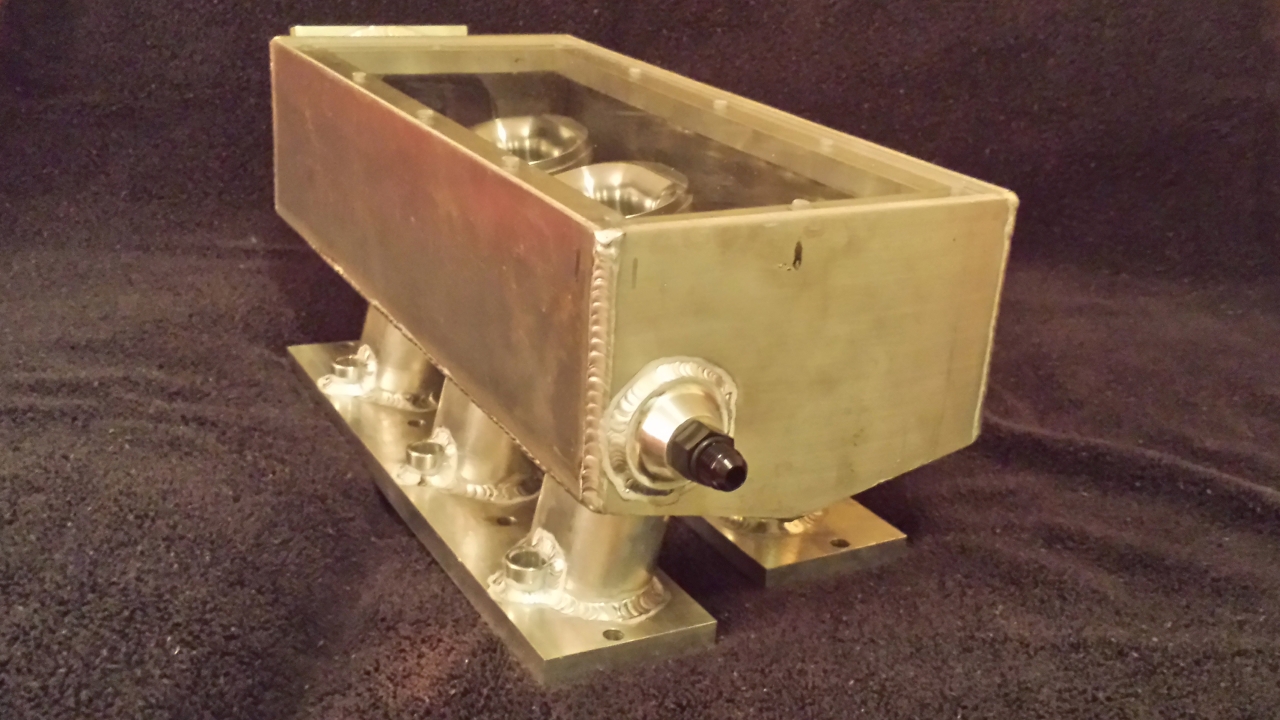
Custom Intake back
Like your work. Good job on this intake. Do you plan on replicating them? I also have a 3.7 mustang all stock with stock Pirellis went 13.84 @ 101.89 mph. I will use some of your ideas for weight reduction. These cars are heavy. Hope you try your car soon on the 1/4 mile with the intake. I was looking at your passes and you definitely need more gear to be able to use the 4th gear in its entire power band. I would go with 4.10 or 4.30. Good luck!
I’m looking for an upgraded intake for my 3.7 mustang! Can you sell these or know anyone who sells aftermarket intakes?? All I can find are for the 5.0
Either Super Six Motorsports (http://www.supersixmotorsports.com/) or on Facebook there is a the Cyclone Mustang group (https://www.facebook.com/groups/CycloneMustangs/) that you can find ported intakes. This was a one off I did to see if it would give me any gains and it didn’t, I actually lost power because the runners were too short. Thanks for checking out my site!
How do I contact you? I need one of these BADLY for my F150 Ecoboost drag truck as do many others. We need this for aux fueling, I can’t believe I haven’t seen this before.
Please contact me on ability to replicate these!!!
Thanks!
Mike
Do you have the files for the flanges? I would like to build a long runner intake.